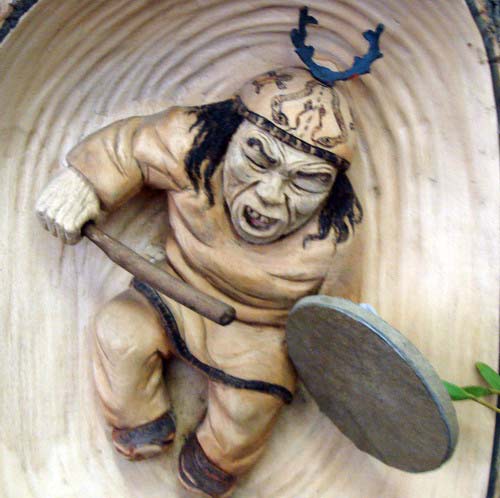
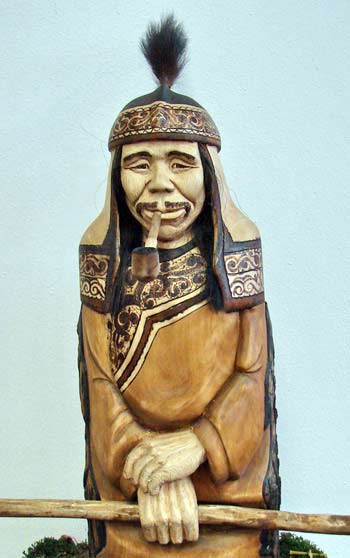
Woodcarving. The exhibition at the Museum Arsenyev Vladivostok
On every face - an imprint of life as a unique pattern on a cut tree.
Vladimir Boyko was born in the village. Krasny Yar, Primorsky Krai. All his childhood he spent in the forest, where he met with Udege. At the mine "Far" in the area Kavalerovskom lived about 20 years, worked in the mines of Chukotka, a diligent Artel looking for gold, tin.
In the 30 years he wanted to cut the wood face Dersu Uzala And picking up a lime churochku, a tool was cut and I realized: it turns out! Vladimir Boiko only works with natural materials (lime, aspen, and occasionally Tim, deer fur, leather, horse hair!).
Most Vladimir likes to make "portraits" of the elderly Udege, although among his works is Slavic, Mongolian, African face. All of them are drawn from real prototypes. Grandma Ouzou - one of them. On every face - an imprint of life as a unique pattern on a cut tree.


ـــــــــــــــــــــــــــــــــــــــــــــــــــــــــــــــــــــــــــــــــــــــــــــــــــــــــــــــــ
How to Carve a Wooden Horse Sculpture
Begin with an idea in mind. I want to create a small hobby horse wood carving, sort of like the horses of an old merry-go-round. This will a bit more involved and complicated than my wooden carved cat sculptures due to the shape of the horse. The head and neck of a horse rises higher than the body so a wider piece of wood is required. Other than this, the project is very similar and really easy.
I usually do my wood carving from a 2 X 4 beam and align the project lengthwise, such as my carved cat statues. Using a wooden plank that is two inches wide (that is, 1.75 inches but it is called "2 inches" I’ll explain why next) and 6 inches wide, we have the material to begin.
A "2 X 4" or any other board, beam or plank are these stated dimensions when rough-sawed at the mill. This is where the naming convention originates. Because this is rough lumber, it needs to be planed to smooth surfaces. Therefore, a "2 X 4" inch beam is really1.75 X 3.75 inches, a "1-in. board" is really 0.75 inches thick, and etc. It can be a little confusing with finished lumber being stated by their rough-cut dimensions but the figures are standard so once you are used to this reductive measuring system, it makes sense. Now, lets make the template for the hobby horse wood carving
Sketch your Design on Card-stock Paper, -a Horse

Create a cardboard template based upon this width of the beam being used (the height of the horse is the width of the beam.) I just lay the 2 X 6 plank across the white cardboard and trace the width and provide sufficient length for the project and base my design upon these parameters.
Using a pizza box as the template cardboard, I have traced the width of the beam onto the white underside and from that, sketched a fair approximation of the design that we will make. I decided after I drew this to make the horse body longer, depicted by the black arrows as a reminder when tracing to the wood. A clever shortcut here to avoid having to deal with the slender legs is to create this template from the body up, omitting the legs. Perhaps the horse is wading through water, perhaps the lower body is hidden in the dust stirred up by its passage. The imagination is yours. This larger surface area of the bottom will also make the final project more stable; it will stand upright and be less likely to tip
The Wood-carved Horse Template

Some minor sketch details are added to help visualize the effect we are after, and the template is simplified to the most basic outline possible. Save this template of course, for it is endlessly reusable and most helpful if you intend to create matched pairs of these horses.
Trace the Template Upon the 2×6 Wood Stock

Again, some detail is added here to the wood itself to help visualize the horse. I like to trace as many blanks onto the wood stock as possible and cut them all out at one time. This way I have ready-made ‘planchets‘ or ‘blanks‘ anytime I get the urge to do a little wood-carving. The hardest part is probably cutting all of these out. It is a bit time-consuming but the time you save now will be rewarded later.

As you can see, I try to squeeze an many tracings of the horse design onto my wood stock as possible. The planchets are photo-highlighted for detail. Note the three little triangular sections just ahead tail, the rear leg and just behind the front leg; Do not cut these out with the jigsaw! These are just visual guides traced onto the wood. The ‘recesses’ will be carved or sanded-in later. Cutting these ‘notches’ out now with the jigsaw will make the recesses too deep, leave tell-tale saw-blade marks and complicate the finish-sanding of the body.
Cut Out the Planchets using an electric Jig Saw

Notice that the three triangular recesses on each planchet as mentioned above are NOT cut-out.
Power tools are a must for these types of projects. I used to cut these out by hand, using narrow-bladed hand & coping saws. But for speed and accuracy, nothing beats a good electric jig saw such as the one shown here.
Use a medium-gauge blade for speed of cutting and for not producing too rough of a cut edge. Be sure that the blade is a sharp one. If the blade is dull from repeated use, change it. A dull blade ‘wanders’ from true vertical when cutting around corners and makes the planchets somewhat more difficult to render. I use my jig saw for many other projects around the home, not just my hobby work. So it is not uncommon that I begin projects like this that demand precision by changing the jig blade to a new one. Saw blades are cheap. When dull, don’t be hesitant to install a new one.
Wood Carving Made Simple! High Speed Rotary Cutting Tools!

Using the HIGH SPEED CUTTING BIT (shown left) in the rotary tool and wearing eye goggles and other protection, we begin to rough-out the general shape of the horse. The front legs will need to be delineated by carving-out the portion shown in hash-marks on the template. This is to suggest that the horse is perhaps taking a step forward with the left-front leg. The rear legs will be rendered more or less side-by-side.
The tail will be pared-down to a roundish ‘upside-down teardrop’ shape that grows more narrow towards the lower end of the tail, but will terminate upon the tabletop surface as a blunt stump perhaps the diameter of your thumbnail. The mane of the horse while it looks tricky to rough-out, is really easy. Just remove the wood that isn’t ‘the mane.’ This may sound simplistic, but this is all that wood-carving (or stone-carving, for that matter) really is about. -Just removing that which isn’t the subject. Try to imagine the desired object ‘inside’ of the wood, and remove that which isn’t.


The ‘hair detail’ of the tail and mane will be added later after sanding the body smooth and curvaceous.
thax to : http://factoidz.com/how-to-carve-a-wooden-horse-sculpture/
ــــــــــــــــــــــــــــــــــــــــــــــــــــــــــــــــــــــــــــــــــــــــــــــــــــــــــــــــــــــ
wood carving workes - woodcarving


see what you can do with wood carving tooles start woodcarving
we believe there are age limits as to when your child should give woodcarving a try! Giving a young child a sharp knife or tool is not a good idea. In fact should a child cut himself, it could seriously dampen his spirits and turn him off of woodcarving altogether. Around the age of 14 years, a child shows signs of developing two essential traits necessary for woodcarving: eye-hand coordination and patience. Without eye-hand coordination, and without the patience to follow your instructions, the risk of personal injury is very high.
ــــــــــــــــــــــــــــــــــــــــــــــــــــــــــــــــــــــــــــــــــــــ
Wood sculpture - Pr German Renaissance Moresca dancer Munich town hall


Pair of German Renaissance style Moresca dancers Munich town hall sculptures. See original pair at the Museum Munich, Stadt. See a very similar pair illustrated in page 220 in "Luxury Arts of the Renaissance" by Marina Belozerskaya The J. Paul Getty Museum Los Angeles. "The moresca a highly popular dance at courts across Europe was, in contrast, mostly a spectator sport of the aristocracy, as it was performed primarily by professional dancers accompanied by pipe and tabor. Baldesar Castiglione admonished that if a courtier wished to dance the moresca, he had best do so in private". This pair were made from Tere Cotta and are exact 20th reproductions of the originals. Each figure measures 27 and one half inches high and 16 inches deep. Excellent condition with minor repairs to two fingers
ـــــــــــــــــــــــــــــــــــــــــــــــــــــــــــــــــــــــــــــــــــــــــــــــ
wood carved clocks


ــــــــــــــــــــــــــــــــــــــــــــــــــــــــــــــــــــــــــــــــــــــــــــــــــــــــــــ
wood carving Designs - Duck Pond


The ducks you are watching in the pictures were purchased and not carved by me... Both ducks were having very odd shaped acrylic base..When we saw those ducks in shop at Lahore City, they attract our hearts and we decided to make a pond for them..
And then on coming back, we brain-stormed on many types of ponds... After finalizing the design in CAD and CAM software , i decided to carve it out on 'Mango wood.. Later we decided to add some holes in the Pond to accommodate the fresh grass as a cat-tail..
This pond is not with us..My mother liked it so much that i gifted to her..she was very happy at the moment...